
So, you’ve decided to rip out that old bathroom vanity. Nice. Bold move.
Maybe it’s outdated, maybe it’s falling apart, or maybe you just can’t stand looking at it anymore (we’ve all been there).
I’ve removed a few vanities myself, and trust me—it’s not as scary as it looks. But here’s the thing: if you rush it, you can mess up your plumbing, crack tiles, or worse… flood your bathroom. Yeah, not fun.
Want to How to Remove a Bathroom Vanity fast and safely without turning your bathroom into a disaster zone? Good. Let’s get into it.
Why Removing a Bathroom Vanity Isn’t as Simple as It Looks
You might think, “Just unscrew it and yank it out, right?”
Nope. If only it were that easy.
A vanity connects to:
- Water supply lines
- Drain pipes
- Wall mounts or brackets
- Sometimes even tile or backsplash adhesive
Miss one step, and you’ll regret it instantly.
Ever accidentally loosened a pipe and got sprayed like a cartoon character? Yeah… let’s avoid that.
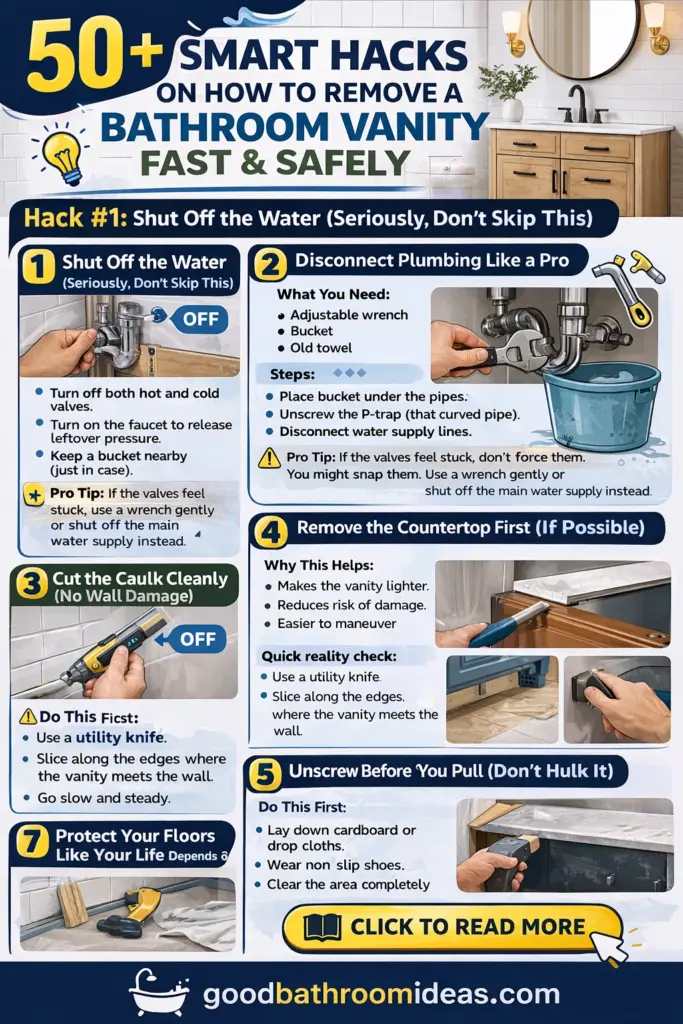
Hack #1: Shut Off the Water (Seriously, Don’t Skip This)
Why This Matters
Before you touch anything, turn off the water supply. I’m not joking.
You’ll usually find shut-off valves under the sink. Turn them clockwise until they stop.
Quick Checklist:
- Turn off both hot and cold valves
- Turn on the faucet to release leftover pressure
- Keep a bucket nearby (just in case)
Pro Tip: If the valves feel stuck, don’t force them. You might snap them. Use a wrench gently or shut off the main water supply instead.
Hack #2: Disconnect Plumbing Like a Pro
Now comes the slightly messy part.
What You Need:
- Adjustable wrench
- Bucket
- Old towel
Steps:
- Place the bucket under the pipes
- Unscrew the P-trap (that curved pipe)
- Disconnect water supply lines
Expect some water to spill. That’s normal.
IMO, this is where most beginners panic. Don’t. It’s just leftover water, not a plumbing apocalypse 🙂
Hack #3: Cut the Caulk Cleanly (No Wall Damage)
Why You Should Care
Vanities stick to walls with caulk. If you pull without cutting it, you risk:
- Tearing drywall
- Peeling paint
- Breaking tiles
Do This Instead:
- Use a utility knife
- Slice along the edges where the vanity meets the wall
- Go slow and steady
Ever tried ripping off tape and ended up removing paint too? Same concept.
Hack #4: Remove the Countertop First (If Possible)
Some vanities come in two parts:
- Cabinet
- Countertop
Why This Helps:
- Makes the vanity lighter
- Reduces risk of damage
- Easier to maneuver
How to Do It:
- Cut any adhesive or silicone seal
- Gently lift the top (get help if it’s heavy)
Quick reality check: Granite tops are heavy. Like, “why did I think I could lift this alone?” heavy.
Hack #5: Unscrew Before You Pull (Don’t Hulk It)
You’re not in an action movie. Don’t just yank it out.
Look for Screws:
- Inside the cabinet (back panel)
- Along the sides
- Under the countertop
Use a drill or screwdriver and remove every screw.
Miss one screw, and you’ll feel like the vanity is glued to the wall forever.
Hack #6: Use a Pry Bar Gently (Keyword: Gently)
Once everything is disconnected, you might still need some force.
Here’s the Smart Way:
- Slide a pry bar behind the vanity
- Use a wood shim to protect the wall
- Apply slow, even pressure
Don’t rush this step. Walls are weaker than you think.
Ever cracked drywall by accident? It escalates quickly.
Hack #7: Protect Your Floors Like Your Life Depends on It
You don’t want to remove a vanity and then realize you destroyed your floor.
Do This First:
- Lay down cardboard or drop cloths
- Wear non-slip shoes
- Clear the area completely
Dropping a vanity edge on tile = instant regret.
Another great ideas:
Hack #8: Deal With Stuck Vanities the Smart Way
Some vanities act like they’ve signed a lifetime contract with your wall.
Try This:
- Re-check for hidden screws
- Cut deeper into adhesive lines
- Tap lightly with a rubber mallet
Still stuck?
Take a break and reassess. Seriously.
FYI: Force usually creates more problems than solutions.
Hack #9: Label Everything (Future You Will Thank You)
Why This Is Genius
When you reinstall or replace parts, you’ll forget what goes where.
Quick Label System:
- Use masking tape
- Label pipes: “hot,” “cold,” “drain”
- Keep screws in small bags
Simple? Yes. Life-saving? Also yes.
Hack #10: Clean Up and Inspect Before Installing a New Vanity
You’ve removed the vanity. Nice job.
But don’t rush to install the new one yet.
Check These Things:
- Wall condition (any damage?)
- Plumbing alignment
- Floor level
Fix Before Moving On:
- Patch holes
- Clean debris
- Tighten loose pipes
A clean base = smoother installation later.
Shop on amazon:
Hack #11: Turn Off Electricity Near the Vanity
Why This Matters More Than You Think
Most people forget this step completely.
If your vanity has:
- Lights above the mirror
- Built-in outlets
- Nearby switches
You should cut power from the breaker panel.
Ever mixed water and electricity? Yeah… terrible combo.
Hack #12: Take Photos Before You Touch Anything
Your Future Self Will Thank You
Before you disconnect pipes or remove parts, snap a few quick photos.
Capture:
- Pipe connections
- Valve positions
- Screw placements
Why? Because halfway through reinstalling, you’ll think, “Wait… where did this go?”
This hack saves you from that exact moment.
Hack #13: Use a Headlamp (Game Changer)
Working under a vanity feels like crawling into a cave.
Why a Headlamp Helps:
- Keeps both hands free
- Lights up tight spaces
- Reduces mistakes
I used my phone flashlight once… dropped it twice. Never again.
Hack #14: Loosen Stubborn Nuts with Heat
When Things Refuse to Budge
Old plumbing fittings can get stuck like they’ve fused together.
Try This:
- Use a hairdryer or heat gun
- Warm the metal slightly
- Then try loosening with a wrench
Heat expands metal just enough to help.
Important: Don’t overheat anything near plastic pipes.
Hack #15: Cut Old Vanity Instead of Fighting It
Yes, You Can Break It Apart
If the vanity feels impossible to remove, stop wrestling it.
Smarter Move:
- Use a hand saw or reciprocating saw
- Cut the cabinet into smaller sections
- Remove piece by piece
Sounds extreme? Maybe.
Effective? Absolutely.
Hack #16: Check for Hidden Water Damage
7
Once you remove the vanity, don’t just celebrate and walk away.
Look For:
- Soft drywall
- Mold spots
- Water stains
Ever wondered why your old vanity smelled weird? This is usually why.
Fix it now, or deal with a bigger headache later.
Hack #17: Cap the Pipes Immediately
Avoid Accidental Leaks
After removing plumbing connections, don’t leave pipes open.
Use:
- Pipe caps
- Old rags (temporary fix)
Even with water off, pressure can build up.
One tiny leak can turn into a slippery mess real quick.
Hack #18: Remove Doors and Drawers First
Make Your Life Easier
Before you move the vanity, strip it down.
Take Off:
- Cabinet doors
- Drawers
- Shelves
Why?
- Reduces weight
- Prevents breakage
- Gives better grip
Ever tried carrying bulky furniture through a tight space? Exactly.
Hack #19: Watch Out for Tile Lip Edges
Sometimes tiles extend slightly under the vanity.
What Happens If You Ignore This?
- Tiles crack
- Edges chip
- Floor looks uneven after removal
Fix:
- Gently lift and check edges
- Use a knife or tool to separate cleanly
This small detail can ruin your floor if you ignore it.
Hack #20: Plan Your Exit Path Before Lifting
Sounds Obvious… But People Forget
Before you lift the vanity, ask yourself:
“How am I getting this out?”
Hack #21: Score Paint Lines Before Cutting Caulk
Why This Step Matters
Walls often have paint sealing the vanity edges. If you ignore that, you risk peeling off chunks of paint.
Do This:
- Run a sharp utility knife along paint lines
- Then cut the caulk
Result? Clean edges instead of ugly wall damage.
Ever peeled tape and watched paint come off with it? Yeah… same nightmare.
Hack #22: Use Two Wrenches for Stubborn Connections
The Double-Wrench Trick
Sometimes pipes spin instead of loosening.
Fix It:
- Use one wrench to hold the pipe steady
- Use the second wrench to turn the nut
This prevents twisting and damaging pipes.
Simple move, but it makes you feel like a plumbing genius.
Hack #23: Vacuum As You Go (Trust Me)
Why This Helps
Dust and debris build up fast.
Benefits:
- Keeps workspace visible
- Prevents slipping
- Makes final cleanup easier
I ignored this once and spent more time cleaning than removing. Never again.
Hack #24: Check Wall Stud Locations Before Pulling
Hidden Support Alert
Most vanities attach directly to wall studs.
Why You Should Care:
- Screws might go deep into studs
- You’ll need extra effort to remove them
Quick Tip:
- Use a stud finder
- Focus your effort where it matters
Otherwise, you’ll keep pulling and wonder why it won’t budge.
Hack #25: Slide, Don’t Lift (Save Your Back)
Work Smarter, Not Harder
Instead of lifting the entire vanity:
- Tilt slightly
- Slide it forward slowly
Why This Works:
- Reduces strain
- Prevents dropping
- Keeps control
Your back will thank you later. Seriously.
Hack #26: Tape Sharp Edges Before Handling
Avoid Surprise Injuries
Broken laminate or wood edges can get sharp.
Quick Fix:
- Wrap edges with duct tape or painter’s tape
Result:
- Safer handling
- Less risk of cuts
Nothing kills DIY momentum faster than a random hand injury.
Hack #27: Keep a “Parts Zone” Organized
Don’t Lose Small Stuff
Screws, brackets, and fittings disappear fast.
Create:
- A small box or tray
- Separate sections for parts
Label if needed:
- “Wall screws”
- “Pipe fittings”
You’ll avoid the classic “Where did that screw go?” moment.
Hack #28: Check for Silicone Bonds Under the Sink Rim
7
Hidden Glue Situation
Even after removing screws, sinks often stick due to silicone.
Solution:
- Carefully cut around the sink rim
- Wiggle gently to loosen
Miss this, and you’ll feel like the vanity is welded in place.
Hack #29: Use Knee Pads (Underrated but Genius)
Comfort = Better Focus
You’ll spend time kneeling, bending, twisting.
Why Knee Pads Help:
- Reduce strain
- Keep you comfortable
- Help you work longer without fatigue
Sounds small, but it makes a big difference.
Hack #30: Do a Final “Nothing Attached?” Check
The Golden Rule Before Removal
Before you pull the vanity out, pause.
Ask yourself:
“Is anything still connected?”
Double-Check:
- Water lines
- Drain pipes
- Screws
- Adhesive spots
This one habit prevents 90% of DIY mistakes.
Hack #31: Test the Faucet After Shut-Off (Don’t Assume)
Why You Should Never Trust Valves Blindly
You turned off the water… great. But is it actually off?
Do This:
- Turn the faucet on
- Wait a few seconds
If water keeps flowing, your valve might be faulty.
Better to check now than get surprised mid-removal.
Hack #32: Use a Plastic Putty Knife Before Metal Tools
Start Gentle, Then Get Aggressive (If Needed)
Before grabbing a pry bar, try a plastic putty knife.
Why It Works:
- Reduces wall damage
- Slides easily under edges
- Great for loosening adhesive
Think of it as a “soft entry” move.
Hack #33: Protect Pipes from Accidental Kicks
Hidden Risk
Once the vanity is gone, pipes sit exposed.
Quick Fix:
- Wrap pipes with foam or cloth
- Keep tools away from them
One accidental hit = bent pipe = extra repair.
No thanks.
Hack #34: Mark Vanity Outline on the Wall
A Sneaky Smart Move
Before removal, trace around the vanity edges lightly with a pencil.
Why?
- Helps when installing a new vanity
- Shows original placement
- Guides alignment
Ever tried installing something “by eye”? Yeah… it rarely ends well.
Hack #35: Check Floor Condition Under the Vanity
7
What You Might Find
You’ll often discover surprises under old vanities.
Look For:
- Uneven tiles
- Rotting wood
- Mold or stains
Fixing this now saves you from bigger issues later.
Hack #36: Use a Magnet to Find Hidden Screws
Genius and Simple
Some screws hide under paint or filler.
Trick:
- Run a magnet across the surface
- It will “stick” where screws are
Feels like a cheat code, honestly.
Hack #37: Keep a Spray Bottle Nearby
Small Tool, Big Impact
Dust and debris fly around while removing a vanity.
Use Water Spray To:
- Reduce dust
- Keep air cleaner
- Improve visibility
It’s a tiny step, but your lungs will appreciate it.
Hack #38: Wear Gloves with Grip (Not Just Any Gloves)
Control Matters
Loose or slippery gloves can make tools harder to handle.
Choose:
- Rubberized grip gloves
- Snug fit
Why:
- Better control
- Less slipping
- Safer handling
You want control—not tools flying out of your hand.
Hack #39: Remove Backsplash Separately (If Attached)
Don’t Overlook This
Some vanities have a backsplash attached to the wall.
Steps:
- Cut caulk around edges
- Pry gently with a flat tool
- Remove before pulling the vanity
If you skip this, you risk cracking tiles or damaging drywall.
Hack #40: Take Breaks (Yes, It’s a Strategy)
Seriously—Don’t Power Through Everything
Fatigue leads to mistakes.
Smart Move:
- Pause after major steps
- Re-check your work
- Reset your focus
Ever rushed through something and messed it up at the last second? Exactly.
Hack #41: Check for Hidden Wall Anchors
The Sneaky Culprits
Some vanities use wall anchors instead of standard screws.
Why This Matters:
- Anchors expand behind drywall
- They won’t come out easily
What To Do:
- Unscrew gently
- Pull anchors out with pliers
- Patch holes later
Ever pulled something out and took half the wall with it? Yeah… this prevents that.
Hack #42: Use a Mirror to See Tight Spots
See What Your Eyes Can’t
You can’t always fit your head inside the cabinet (thankfully).
Trick:
- Use a small handheld mirror
- Angle it to spot hidden screws or connections
Feels like detective work… but it works.
Hack #43: Warm Up the Room Slightly
Sounds Odd, But It Works
Cold materials become stiff and brittle.
Benefits of a Slightly Warm Room:
- Adhesives loosen faster
- Pipes expand slightly
- Less resistance overall
No need to turn your bathroom into a sauna—just make it comfortable.
Hack #44: Don’t Forget the Toe Kick Area
Hidden Attachment Zone
The toe kick (bottom front panel) often hides screws or adhesive.
Check For:
- Nails or screws
- Glue or caulk
Why It Matters:
If you ignore this area, the vanity won’t budge—and you’ll wonder why.
Hack #45: Use a Flat Dolly for Heavy Units
Save Your Back (Again)
If the vanity is large or solid wood, don’t carry it.
Use:
- A furniture dolly
- Or even a sturdy board with wheels
Benefits:
- Easy movement
- Less risk of dropping
- Faster removal
Your future self will thank you. Trust me.
Hack #46: Keep a Trash Bag Nearby (Non-Negotiable)
Stay Organized While You Work
Debris piles up fast.
Toss Immediately:
- Old screws
- Broken wood
- Caulk scraps
Why:
- Cleaner workspace
- Fewer tripping hazards
Ever stepped on a random screw mid-project? Yeah… not fun.
Hack #47: Check Drain Pipe Alignment Before Removal
Avoid Extra Plumbing Headaches
Before disconnecting everything, take a quick look.
Ask Yourself:
- Is the drain centered?
- Is it offset?
- Does it look crooked?
Why It Helps:
You’ll plan better for the new vanity installation.
Hack #48: Use Painter’s Tape to Protect Wall Edges
A Simple but Powerful Trick
Before prying or cutting, apply painter’s tape along wall edges.
Benefits:
- Prevents scratches
- Reduces paint chipping
- Cleaner finish
It takes 2 minutes but saves you from ugly touch-ups.
Hack #49: Don’t Rush the Final Pull
The Most Common Mistake
Everything is disconnected… and you just want it out.
But wait.
Do This:
- Wiggle gently
- Pull slowly
- Watch for resistance
If something feels stuck, it probably is.
Rushing here causes the most damage—walls, pipes, or floors.
Hack #50: Do a Full Cleanup Before Calling It Done
Finish Like a Pro
Don’t just walk away after removal.
Final Steps:
- Vacuum dust and debris
- Wipe down surfaces
- Inspect everything again
Why This Matters:
A clean, prepped space makes installing your new vanity way easier.
Common Mistakes to Avoid (Learn From My Pain)
Let me save you some trouble.
Don’t:
- Skip turning off water (seriously… don’t)
- Yank instead of unscrewing
- Ignore hidden fasteners
- Rush the process
I once rushed a removal and cracked a tile. That repair cost more than the new vanity. Lesson learned.
Tools You’ll Need (Keep It Simple)
You don’t need a full workshop.
Basic Tools:
- Adjustable wrench
- Screwdriver or drill
- Utility knife
- Pry bar
- Bucket
Optional but helpful:
- Gloves
- Safety glasses
- Flashlight
That’s it. No fancy gear required.
When You Should Call a Professional
Let’s be honest—sometimes DIY isn’t the best move.
Call a pro if:
- Pipes look damaged or corroded
- You can’t shut off water
- Vanity is custom-built into the wall
- You feel unsure at any step
No shame in it. Better safe than sorry.
Final Thoughts: You’ve Got This
Removing a bathroom vanity sounds intimidating, but it’s totally doable.
Just remember:
- Prep properly
- Take your time
- Respect the plumbing
Ever noticed how most DIY disasters come from rushing? Exactly.
Do it right once, and you’ll feel like a pro.
And hey, once you finish… you’ll probably start eyeing the rest of your bathroom like, “What else can I upgrade?” 😄
Quick Recap
Clean and inspect before installing new vanity
Turn off water first (non-negotiable)
Disconnect plumbing carefully
Cut caulk before pulling
Remove screws, then pry gently
Protect your floors and walls