

So, you’ve finally decided how to replace a Bathroom Vanity. Nice. That old cabinet probably squeaks, stains everything, and makes your bathroom look like it time-traveled from 2003. I’ve been there—I once ignored a leaking vanity for months… until the wood basically waved a white flag.
Here’s the deal: replacing a bathroom vanity isn’t rocket science, but it can go sideways fast if you skip the basics. Ever tried installing a vanity only to realize it doesn’t fit through the door? Yeah… not fun.
Let’s walk through this step by step—like two friends figuring it out together—so you don’t make those annoying, expensive mistakes.
Before You Start: Prep Like a Pro
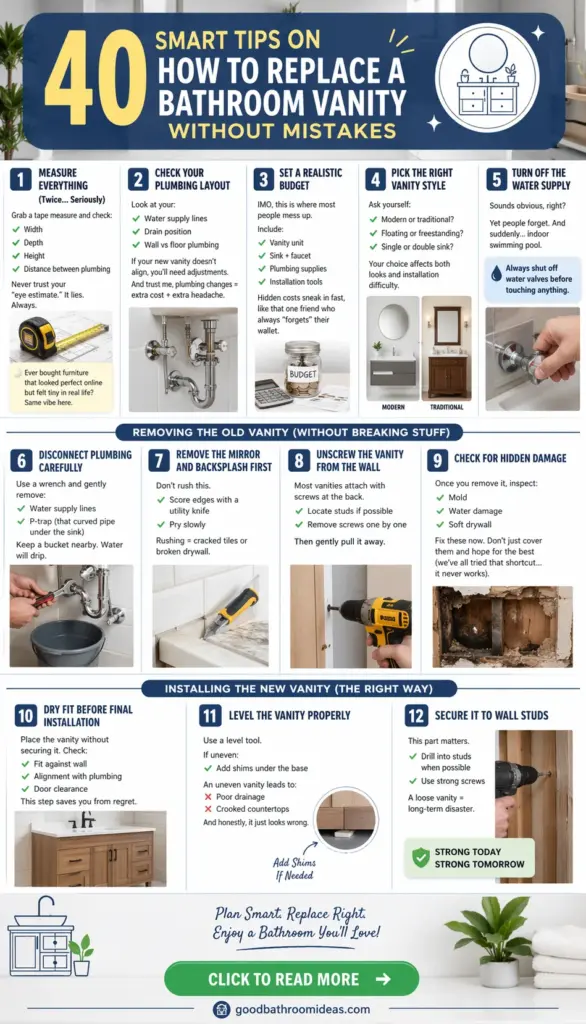
1. Measure Everything (Twice… Seriously)
Grab a tape measure and check:
- Width
- Depth
- Height
- The distance between plumbing
Never trust your “eye estimate.” It lies. Always.
Ever bought furniture that looked perfect online but felt tiny in real life? Same vibe here.
2. Check Your Plumbing Layout
Look at your:
- Water supply lines
- Drain position
- Wall vs floor plumbing
If your new vanity doesn’t align, you’ll need adjustments. And trust me, plumbing changes = extra cost + extra headache.
3. Set a Realistic Budget
IMO, this is where most people mess up.
Include:
- Vanity unit
- Sink + faucet
- Plumbing supplies
- Installation tools
Hidden costs sneak in fast, like that one friend who always “forgets” their wallet.
4. Pick the Right Vanity Style
Ask yourself:
- Modern or traditional?
- Floating or freestanding?
- Single or double sink?
Your choice affects both looks and installation difficulty.
5. Turn Off the Water Supply
Sounds obvious, right?
Yet people forget. And suddenly… indoor swimming pool.
Always shut off water valves before touching anything.
Removing the Old Vanity (Without Breaking Stuff)
6. Disconnect Plumbing Carefully
Use a wrench and gently remove:
- Water supply lines
- P-trap (that curved pipe under the sink)
Keep a bucket nearby. Water will drip.
7. Remove the Mirror and Backsplash First
Don’t rush this.
- Score edges with a utility knife
- Pry slowly
Rushing = cracked tiles or broken drywall.
8. Unscrew the Vanity from the Wall
Most vanities attach with screws at the back.
- Locate studs if possible
- Remove screws one by one
Then gently pull it away.
9. Check for Hidden Damage
Once you remove it, inspect:
- Mold
- Water damage
- Soft drywall
Fix these now. Don’t just cover them and hope for the best (we’ve all tried that shortcut… it never works).
Installing the New Vanity (The Right Way)
10. Dry Fit Before Final Installation
Place the vanity without securing it.
Check:
- Fit against wall
- Alignment with plumbing
- Door clearance
This step saves you from regret.
11. Level the Vanity Properly
Use a level tool.
If uneven:
- Add shims under the base
An uneven vanity leads to:
- Poor drainage
- Crooked countertops
And honestly, it just looks wrong.
12. Secure It to Wall Studs
This part matters.
- Drill into studs when possible
- Use strong screws
A loose vanity = long-term disaster.
13. Install the Sink and Faucet First
It’s easier before placing it fully.
Attach:
- Faucet
- Drain assembly
Trying this later in tight space? Good luck… 😅
14. Reconnect Plumbing
Carefully attach:
- Water lines
- Drain pipes
Tighten firmly, but don’t overdo it.
Overtightening can crack fittings.
Another amazing ideas about How to Replace a Bathroom Vanity :
15. Seal Edges with Caulk
Apply caulk where vanity meets:
- Wall
- Floor
This prevents:
- Water damage
- Mold growth
Plus, it gives a clean finish.
Avoid These Common Mistakes (Seriously)
16. Ignoring Ventilation
Bathrooms get humid fast.
Without ventilation:
- Wood warps
- Mold grows
Always ensure airflow.
17. Choosing Looks Over Function
That ultra-modern vanity might look amazing…
But:
- Does it have storage?
- Is it durable?
IMO, balance both.
Shop here amazing vanity designer mirror :
- LOAAO 32″X32″ LED Bathroom Mirror with Lights
- WallBeyond LED Bathroom Mirror with Lights, 25 x 35 Inch Led Bathroom Vanity Mirror
18. Forgetting Storage Needs
Think about your daily use.
Do you need space for:
- Towels
- Toiletries
- Cleaning supplies
A pretty vanity without storage = daily frustration.
19. Skipping Wall Reinforcement
Floating vanities need strong support.
If your wall isn’t ready:
- Reinforce studs
- Add backing support
Otherwise… gravity wins.
20. Rushing the Process
I get it—you want it done ASAP.
But rushing leads to:
- Misalignment
- Leaks
- Costly fixes
Take your time. Future you will thank you.
21. Mark Plumbing Positions Before Removal
Before you remove the old vanity, grab a marker and note:
- Pipe locations
- Height from floor
- Distance from wall
This tiny step saves massive guesswork later. Ever tried remembering exact measurements from memory? Yeah… doesn’t work.
22. Take Photos Before You Start
Sounds basic, but it’s gold.
Snap photos of:
- Plumbing connections
- Vanity positioning
- Wall setup
When you forget how something connects (and you will), your phone becomes your best guide.
23. Upgrade Old Shut-Off Valves
If your valves look rusty or ancient, replace them.
Why?
- Old valves leak
- They may not close properly
New valves = peace of mind. Trust me, you don’t want to deal with a valve that refuses to shut off.
24. Use Flexible Water Supply Lines
Rigid pipes look neat but cause trouble during installation.
Flexible lines:
- Fit easily
- Reduce alignment issues
- Save time
IMO, flexibility wins every time here.
25. Don’t Forget About Door Swing Space
Open your bathroom door and imagine the new vanity.
Ask yourself:
- Will drawers hit the door?
- Is movement restricted?
Bad spacing = daily irritation.
26. Pre-Drill Holes for Fixtures
Before attaching anything:
- Drill pilot holes for screws
- Align hardware properly
This prevents:
- Wood splitting
- Crooked handles
Clean work always starts with proper prep.
27. Choose the Right Countertop Materia
Not all countertops survive bathroom life.
Best options:
- Quartz (durable + low maintenance)
- Granite (strong but needs sealing)
- Solid surface (budget-friendly)
Avoid cheap materials that warp with water. Bathrooms don’t forgive poor choices.
28. Install a Backsplash (Even a Small One)
Skipping a backsplash might look minimalist…
But water splashes:
- Damage walls
- Cause stains
Even a small backsplash protects your wall and keeps things clean.
29. Keep a Small Gap for Expansion
Wood expands with moisture. Always.
Leave a slight gap between:
- Vanity and wall
- Countertop edges
Then seal with caulk.
No gap = cracks later.
30. Clean the Area Before Final Installation
Before placing your new vanity:
- Sweep debris
- Wipe dust
- Dry the floor
Installing on a dirty base can:
- Affect leveling
- Trap moisture
Clean base = solid installation.
31. Check Floor Level Before Anything Else
Don’t assume your floor is level. It rarely is.
Use a level tool and check:
- Front to back
- Side to side
An uneven floor messes up everything from alignment to drainage.
32. Protect Your Floor During Installation
Lay down:
- Cardboard
- Old cloth
- Protective sheet
Why?
Because one slip = scratched tiles. And then you’ll spend more time fixing the floor than installing the vanity.
33. Use Painter’s Tape for Clean Edges
Before applying caulk or drilling:
- Tape the edges
This gives you:
- Clean lines
- Professional finish
Small trick, big visual upgrade.
34. Don’t Overtighten Sink Clips
When securing the sink:
- Tighten gradually
- Stop once snug
Overtightening can:
- Crack porcelain
- Damage countertop
And yes, that mistake hurts… financially.
35. Test Fit the Faucet Holes First
Before final install:
- Place faucet in holes
- Check spacing and alignment
Not all faucets fit all vanities perfectly. Surprised? Most people are.
36. Choose Soft-Close Drawers and Doors
If you’re upgrading anyway, go smarter.
Soft-close features:
- Prevent slamming
- Last longer
- Feel premium
IMO, once you use them, you won’t go back.
37. Keep Plumbing Access Easy
Don’t pack everything tightly inside the cabinet.
Leave space to:
- Reach valves
- Fix leaks
Future you will thank you when something needs repair.
38. Install a Trap Adapter if Needed
Sometimes your drain doesn’t match perfectly.
A trap adapter:
- Ensures proper connection
- Prevents leaks
It’s a small part that solves big headaches.
39. Match Vanity Height to Comfort
Standard height doesn’t fit everyone.
Ask yourself:
- Do you bend too much?
- Is it too high?
Comfort matters more than trends. Always.
40. Let Caulk Dry Before Using the Sink
I know you want to test it immediately…
But wait at least:
- 12–24 hours
Using it too early can:
- Break the seal
- Cause leaks
Patience here saves rework later.
Pro Tips That Make a Huge Difference
Lighting Matters More Than You Think
Install good lighting above or beside the vanity.
Bad lighting = uneven shadows (and questionable shaving results).
Upgrade Hardware for Instant Style
Swap basic handles with:
- Matte black
- Brushed gold
Small change, big impact.
Use Waterproof Materials
Look for:
- PVC boards
- Sealed wood
- Quartz countertops
Bathrooms and water go hand in hand… obviously.
Test Everything Before Final Use
Turn water on and check:
- Leaks
- Drain flow
Wait a few minutes.
No leaks? You’re good.
Final Thoughts: You’ve Got This
Replacing a vanity might feel intimidating at first, but once you break it down, it’s totally manageable.
Just remember:
- Measure carefully
- Prep properly
- Install patiently
And maybe don’t learn plumbing the hard way like I did… 🙂
At the end of the day, a new vanity can completely transform your bathroom. It’s one of those upgrades that feels way more expensive than it actually is.
So, are you ready to ditch that old vanity and upgrade your space?


