
Let’s be honest—measuring a bathroom vanity sounds simple… until you actually try it. One wrong inch and suddenly your dream vanity doesn’t fit, your door won’t open, or worse—you’re stuck doing returns (ugh 😅).
I’ve messed this up before. Yep, I once ordered a vanity that blocked half my bathroom door. Not my proudest DIY moment. But hey, you learn fast when your bathroom turns into an obstacle course.
So if you’re wondering how to measure bathroom vanity correctly, you’re in the right place. I’ll walk you through this like a friend who already made the mistakes—so you don’t have to.
Why Measuring Your Bathroom Vanity Actually Matters
You might think, “Can’t I just eyeball it?”
Short answer: No. Please don’t.
A proper measurement ensures:
- Perfect fit (no awkward gaps or cramming)
- Smooth door and drawer clearance
- Proper plumbing alignment
- Balanced bathroom layout
Ever tried squeezing furniture into a space that’s “almost right”? Yeah… it’s not fun.
Tools You’ll Need Before You Start
Before we jump into the steps, grab these:
- Measuring tape (non-negotiable)
- Notebook or phone notes
- Pencil
- Level (optional but helpful)
- Camera (for reference pics)
FYI, using a metal measuring tape works best. Fabric ones? Not reliable here.
Step-by-Step Guide: How to Measure Bathroom Vanity
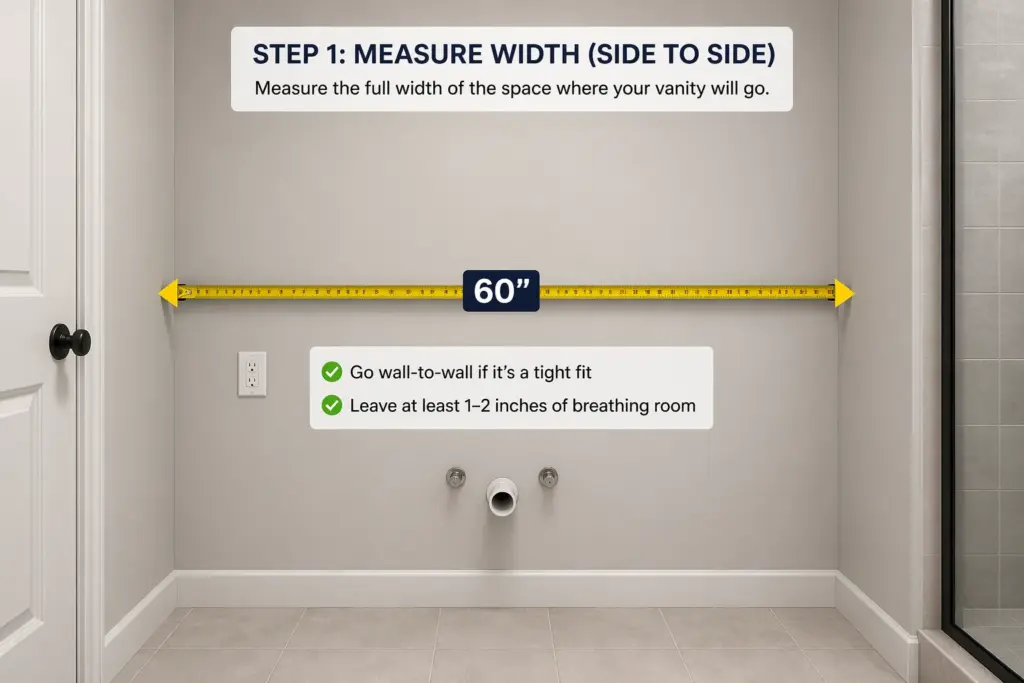
Step 1: Measure the Width (Side to Side)
Start with the most obvious one.
Measure the full width of the space where your vanity will go.
- Go wall-to-wall if it’s a tight fit
- Leave at least 1–2 inches of breathing room
Pro tip: Measure twice. Seriously.
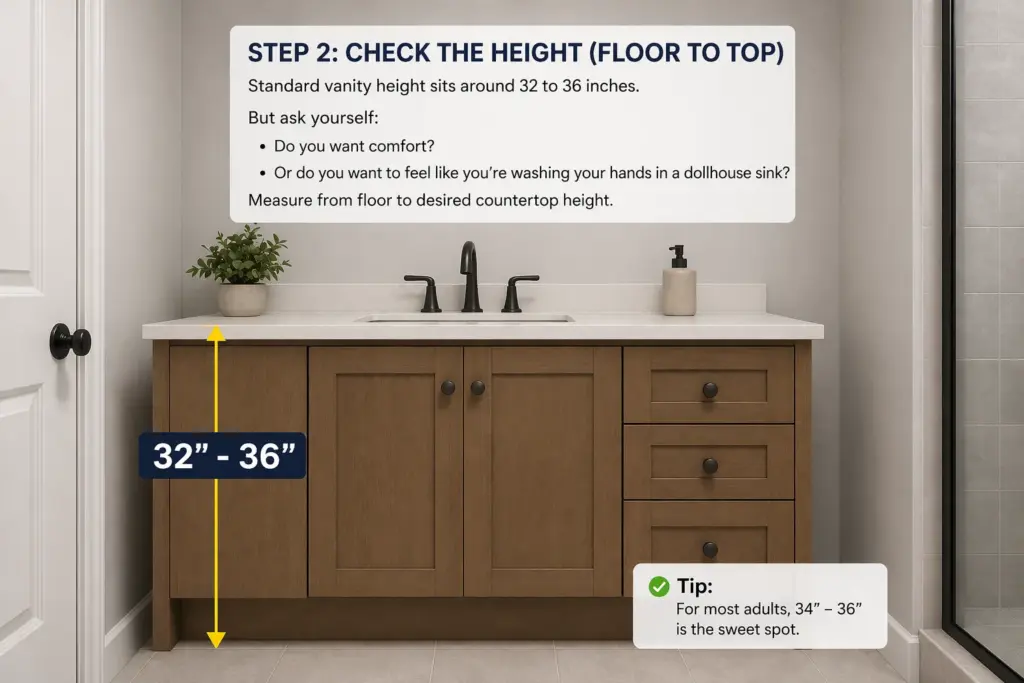
Step 2: Check the Height (Floor to Top)

Standard vanity height sits around 32 to 36 inches.
But ask yourself:
- Do you want comfort?
- Or do you want to feel like you’re washing your hands in a dollhouse sink?
Measure from floor to desired countertop height.
Step 3: Measure the Depth (Front to Back)
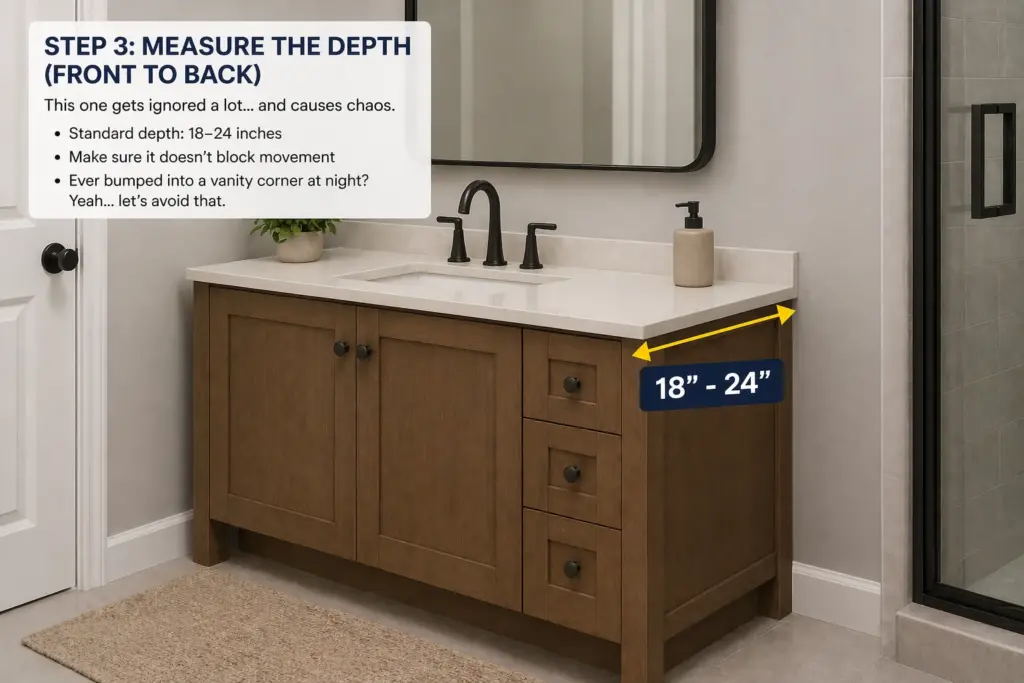
This one gets ignored a lot… and causes chaos.
- Standard depth: 18–24 inches
- Make sure it doesn’t block movement
Ever bumped into a vanity corner at night? Yeah… let’s avoid that.
Step 4: Measure Plumbing Location
Now things get real.
Check:
- Drain pipe position
- Water supply lines
Measure from:
- Floor to pipe center
- Wall to pipe center
Why? Because your vanity must fit around your plumbing, not fight it.
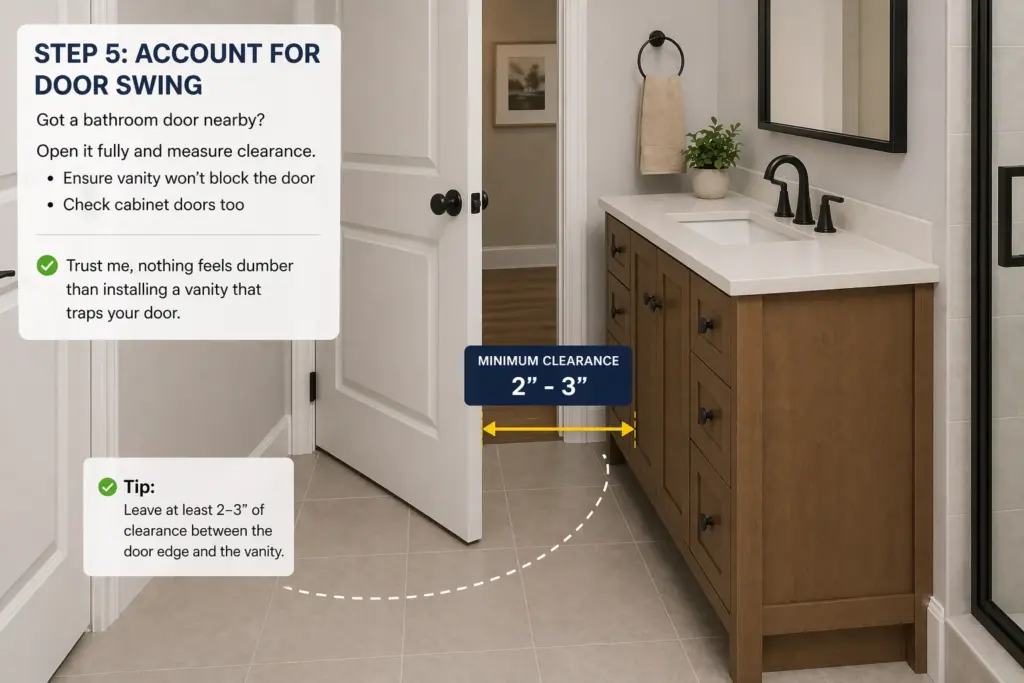
Step 5: Account for Door Swing
Got a bathroom door nearby?
Open it fully and measure clearance.
- Ensure vanity won’t block the door
- Check cabinet doors too
Trust me, nothing feels dumber than installing a vanity that traps your door.
Another ideas :
Step 6: Check Mirror & Lighting Space
Think beyond the vanity.
Measure space for:
- Mirror width
- Lighting fixtures
Everything should align visually. Otherwise, it’ll look… off.
Step 7: Measure Existing Vanity (If Replacing)
If you’re swapping an old vanity:
- Measure width, height, depth
- Compare with new options
IMO, this gives you a solid baseline.
Step 8: Check Wall Space & Obstacles
Look around carefully.
Any of these nearby?
- Toilets
- Showers
- Windows
Measure distances so your vanity doesn’t feel crammed.
Step 9: Measure Floor Space
Your vanity needs breathing room.
Make sure:
- You can stand comfortably
- Drawers can open fully
Shop :
Step 10: Consider Countertop Overhang
Some vanities extend beyond the cabinet.
Add 1–2 inches extra for countertop overhang.
Step 11: Measure Backsplash Area
Planning a backsplash?
Measure:
- Wall width behind vanity
- Height needed
This helps avoid awkward tile cuts later.
Step 12: Double-Check Wall Alignment
Walls aren’t always straight. Annoying, right?
Use a level to check:
- Uneven surfaces
- Warped walls
Step 13: Check Electrical Outlets
Got outlets near your vanity?
Measure their position so you:
- Don’t block them
- Can still use them
Step 14: Measure Storage Needs
Think about your stuff.
Do you need space for:
- Towels?
- Toiletries?
- Hair tools?
Measure accordingly and choose the right size vanity.
Step 15: Plan for Double Sink (If Needed)
Thinking big?
For double vanities:
- Minimum width: 60 inches
- Measure plumbing spacing carefully
Step 16: Consider Legroom (Wall-Mounted Vanities)
Floating vanity? Nice choice.
Measure:
- Space underneath
- Clearance for cleaning
Plus, it makes your bathroom look bigger. Win-win.
Step 17: Check Flooring Level
Uneven floor = wobbly vanity.
Use a level and note:
- Slopes
- Irregularities
Step 18: Mark the Area with Tape
This is my favorite trick.
Use masking tape to:
- Outline vanity size on floor/wall
Suddenly, everything becomes visual and real.
Step 19: Recheck EVERYTHING
Yes, again.
Ask yourself:
- Did I measure width twice?
- Did I note plumbing correctly?
Because fixing mistakes later? Not fun.
Step 20: Compare with Vanity Specs
Now match your measurements with product specs.
Look for:
- Exact dimensions
- Cutout requirements
- Installation notes
Common Mistakes You Should Avoid
Let me save you from classic DIY disasters:
- Ignoring plumbing alignment
- Not leaving clearance space
- Forgetting door swing
- Assuming walls are straight (they’re not!)
- Buying before measuring properly
Ever rushed a purchase and regretted it instantly? Yeah… same.
Pro Tips to Measure Bathroom Vanity Like a Real Expert
Want to level up?
- Always measure in inches and centimeters
- Take photos for reference
- Sketch a quick layout
- Add buffer space (1–2 inches minimum)
And honestly? If something feels off, it probably is.
How to Choose the Right Vanity Size After Measuring
Once you have measurements, choosing becomes easy.
Small Bathrooms
- Go for 18–24 inches width
- Use wall-mounted options
Medium Bathrooms
- 24–48 inches works best
Large Bathrooms
- 60+ inches
- Double sink? Go for it.
Final Thoughts: Measure Smart, Avoid Regret
So here’s the deal.
Measuring your bathroom vanity isn’t hard—but it demands attention.
Skip steps, and you’ll pay for it later (literally).
If you follow these 20 easy steps, you’ll:
- Avoid costly mistakes
- Get a perfect fit
- Actually enjoy your bathroom upgrade
And hey, next time someone struggles with this, you’ll be the “expert” giving advice 🙂
Now tell me—are you measuring your vanity today or still procrastinating?


